
If you are or your company is using an OIDC compliant Identity Provider (which is common nowadays) you can continue using that same user configuration to decide how they can interact with Kubernetes API. EKS will trust that IDP (Identity Provider) and promote the handshake for both systems to allow pass permissions of the users from the IDP to Kubernetes.
We started this topic with a background blog post that explained one alternative of authenticating users in front of a Kubernetes cluster under EKS with OIDC. If you want to learn more about this concept, take a look at it here.
In this post, we are going to the practical side with a guide of how to set OIDC with EKS using Auth0 and authenticate users in this IDP
How does it help scalability?
It’s important to note that this is possible in EKS, because Kubernetes as is, already supports OpenID Connect. AWS took this feature and injected it into the core of EKS, so that you can associate an OIDC provider to the cluster .
You can use the AWS CLI, AWS SDK, CloudFormation, eksctl, or the AWS Management Console to configure the OIDC provider.
After you set everything up correctly, your users will be bound to Cluster Roles that define the specific set of actions they can do against the Kubernetes API.
So, if a new user requires access to the API, you no longer have to go to a configuration file in Kubernetes to allow it, or its role. Instead, it should be added to the IDP already, so ensure it is compliant with the rules you established (i.e belongs to a certain group, has a certain role, etc), then show the user where the Kubernetes cluster is.
Real-life example – Auth0
Auth0 is today one of the biggest platforms that provides scalable and flexible authentication and authorization features. They are also compatible with OIDC, the IDP has this information in the lab.
Requirements
To follow along the lab, make sure you have these requirements:
- A free account on Auth0. You can sign up in here
- An AWS account
- An EKS cluster. We recommend that, if you want to start quickly, use eksctl to quickly create one.
- AWS CLI with the profile configured to your AWS account.
- An IAM user with enough permissions to work with EKS.
- kubectl
Create the EKS Cluster:
Note: If you already have an EKS cluster, please skip this part and go to the first step of the actual process.
We’ll be using eksctl to launch or EKS cluster. It is an open source tool created and maintained by AWS to create and interact with EKS clusters. Their documentation site is very well documented and have multiple options to create and configure the cluster. So if you have specific requirements like access through SSH, have worker nodes in private subnets, number of nodes, custom AMI family, and many other configurations, please take a look at that site for more details.
If there are not specific requirements and want to make this as a learning lab, a cluster with default configurations will run just fine for it. We recommend looking at the cluster.yaml file definition which can have multiple cluster configurations on it.
- Depending on your Operating system, please install EKSCTL accordingly as the documentation stands (Introduction – eksctl).
- After you have it ready, make sure your AWS_PROFILE in your command prompt (bash, powershell, cmd, etc) is set to the correct AWS account you want to deploy this lab into.
- Then, run the following command:
- ➜ eksctl create cluster
This command will create:
- 2 Worker Nodes (m5.large EC2 Instances) with the official AWS EKS AMI
- Use the us-west-2 region, if not region set in your local profile
- Dedicated VPC
Steps:
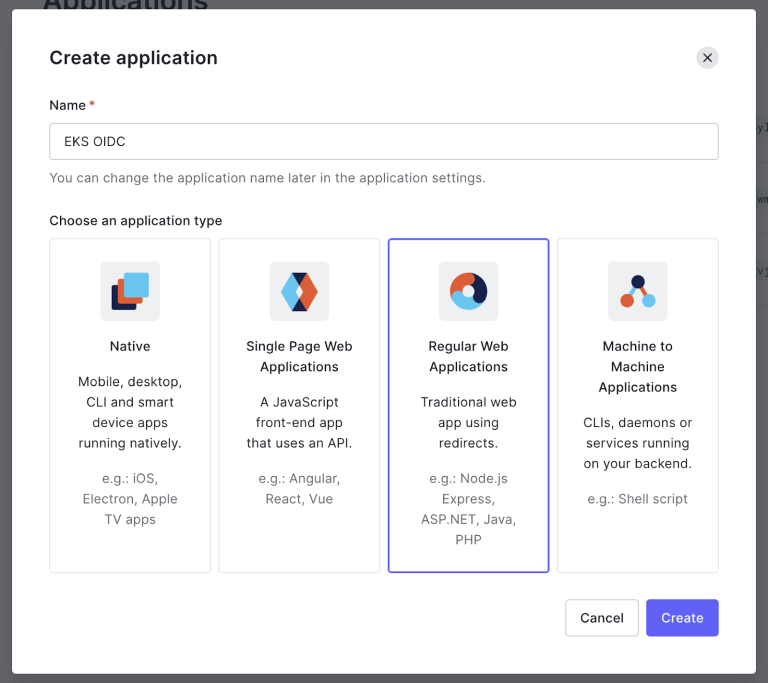
- In Auth0, create a new application of type Regular Web Application. We named it EKS OIDC, but feel free to change it.
2. In the Settings tab of the new application, scroll down until you get to the Advanced Settings. Expand it and select the tab Grant Types. Here, select Implicit, Authorization Code, and Password.

This will tell Auth0 how to handle the flow of this application. For more information about flows, please follow their documentation.
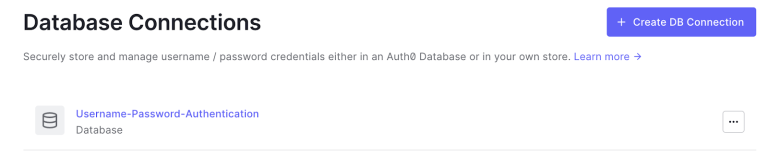
3. In the left panel, under Authorization, select Databases, and create one called something like Username-Password-Authentication. With this we want to establish the database where the users will be created. If the database already exists with that name, skip it and let’s use that one.
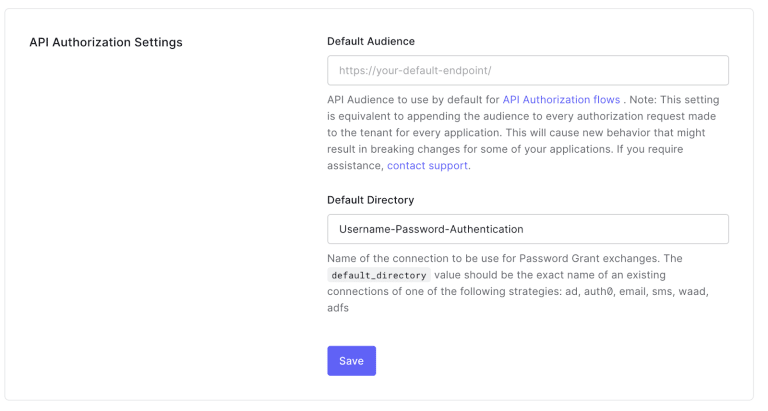
- After creating the database, let’s configure it as the default for API Authorization just to make the integration easier. To achieve this, go to Settings in the left panel in Auth0, then in the General tab, scroll down to the API Authorization Settings. Here select Username-Password-Authentication as the Default Directory.
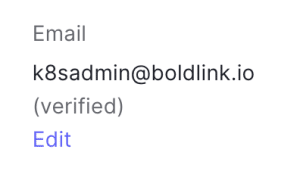
5. Now let’s create a user. Go to the User Management in the left panel, then select Users. Click on Create User, and set it with a password. In our example, we are calling it [email protected]. Also, make sure the Connection field is set to the new database. The email doesn’t have to exist. After you’ve created the new user, click on it and “edit” the email to select the option to verify email.
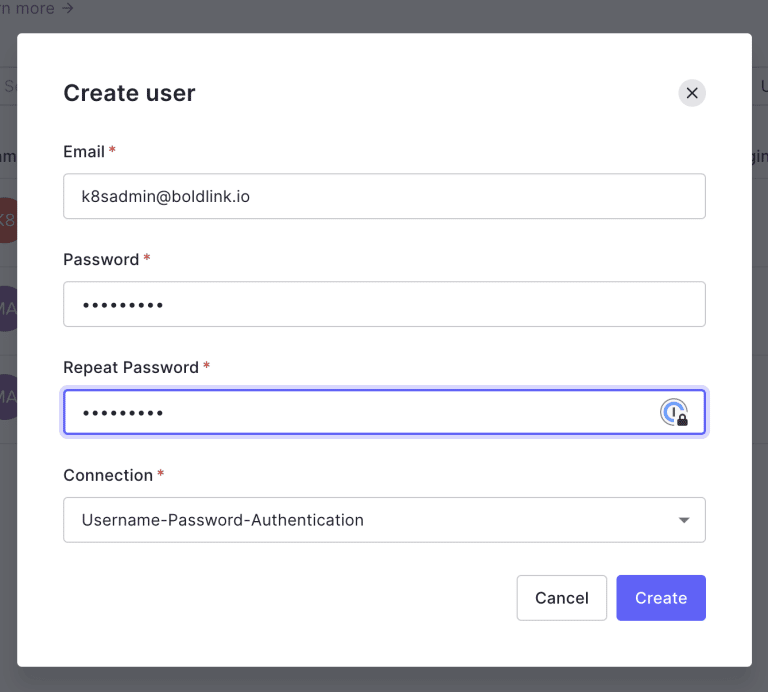
6. Under the user Details, scroll until you see the app_metadata section. Here you can type custom json data to use with the user. In our case, we’ll define the group which the user will be part of. Note that it can be more than one Group, that’s why we made it an array. We’ll add the following json:
					{
  "authorizations": {
    "groups": [
      "KubernetesSecretsViewer"
    ]
  }
}
And that’s it! We already have our first user that is part of the KubernetesSecretsViewer group!. The idea is to give these users permissions to work with Secrets on Kubernetes.
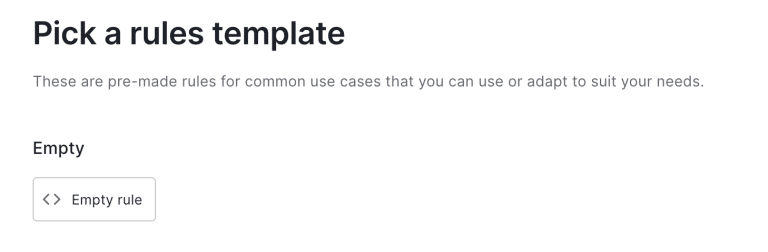
7. Now, the Token that will give us access to Kubernetes provided by Auth0 after the user we created is authenticated, won’t have this metadata right away. We’ll Need to create a Rule that injects this data in the id_token. To do this, we need to go to the Auth Pipeline menu in the left panel on Auth0, and then select Rules. Here, we’ll Create a new rule. In the following page we select Empty Rule.
8. We’ll call it eks-add-groups and the logic on Javascript, which is pretty simple, we’ll add the https://eks.boldlink.io/groups property to the context object:
					function (user, context, callback) {
  context.idToken["https://eks.boldlink.io/groups"] = user.app_metadata.authorization.groups;
  callback(null, user, context);
}
Note: The property https://eks.boldlink.io/groups is an arbitrary name. You can put anything that works for you, but make sure it starts with http:// or https://, so that it’ll be added to the token, otherwise it won’t be included. This value is called namespace. For more information, please follow their documentation here.
Then, click Save Changes. This rule will be Enabled by default, and will be executed when the user logs in successfully.
That is what is needed on the Auth0 side.
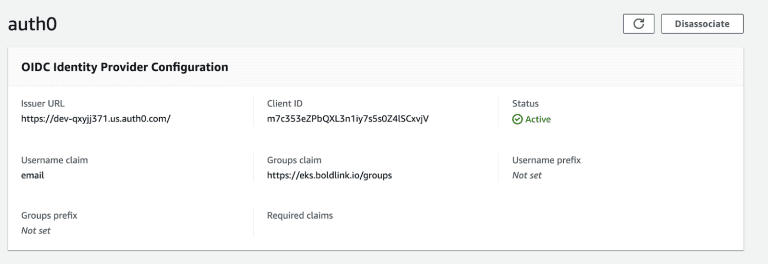
Now, let’s jump on to our EKS cluster in AWS. Let’s go under Configuration, then Authorization. Here, let’s Associate a new OIDC provider.
Let’s use the following fields:
- Name: we called it auth0, it can be anything, go with what you prefer.
- Issuer URL: You get this from the Application you created on Auth0, under the Details section.
IMPORTANT! Take note of whether the URL ends with “/” or not. It needs to match with what the token will contain. Auth0 returns the “/” at the end in the token, so be sure of how your OIDC provider returns the issued URL. - ClientID: Again, taken from the Application in Auth0.
- Username claim: email. This means that the user will be identified by the value “email” from the token.
- Groups claim: https://eks.boldlink.io/groups. This one will match the one we added throughout the rule from Auth0. This will tell Kubernetes where the Group information is located. We didn’t fill the Groups Prefix, Username Prefix, nor Required Claims to simplify the example, but you are welcome to use them if required.
Then save it; it’ll take around 20 minutes to associate; and should result in something like this:
9. After the OIDC provider is available, we can start configuring our local tools to access Kubernetes API via the user we created on Auth0. But before that, we need to create a set of ClusterRole and ClusterRoleBinding to associate the users from the IDP to some actions they’ll be able to do against K8s. This is an example of giving permission to the list, get, and watch secrets to the group KubernetesSecretsViewer:
					---
kind: ClusterRole
apiVersion: rbac.authorization.k8s.io/v1
metadata:
  name: read-secrets
rules:
- apiGroups:
  - ""
  resources:
  - secrets
  verbs:
  - 'get'
  - 'watch'
  - 'list'
---
kind: ClusterRoleBinding
apiVersion: rbac.authorization.k8s.io/v1
metadata:
  name: read-secrets-role-binding
  namespace: default
subjects:
  - kind: Group
    name: "KubernetesSecretsViewer"
    apiGroup: rbac.authorization.k8s.io
roleRef:
  kind: ClusterRole
  name: read-secrets
  apiGroup: rbac.authorization.k8s.io
Note: You should create these objects in one YAML file or two separate files. Then run kubectl apply -f <yaml-file> with the context of a user with higher privilege in the EKS cluster (normally the IAM user who created the cluster will have these permissions)
10. Let’s now get a valid JWT, or JSON Web Token, provided by Auth0 with the user we created. This can be done by calling the Issuer URL via its HTTP Rest API. Here an example of how to do it using cURL:
					curl --request POST \
  --url <issuer-url>oauth/token \
  --header 'Content-Type: application/x-www-form-urlencoded' \
  --data grant_type=password \
  --data client_id=<client_id> \
  --data client_secret=<client_secret> \
  --data username=<username> \
  --data 'password=<password>'
Replace the values <issuer-url>, <client_id>, <client_secret>, <username>, and <password> with your corresponding ones. The first three can be gotten from the Application in Auth0. The username (in our case [email protected]) and password are the corresponding ones for the user created before.
This, if successful, will return a JSON response with multiple properties on it. We are interested in id_token. You can validate the content of that token by going to https://jwt.io/ an putting it there. The output should be something like this
The important properties here are https://eks.boldlink.io/groups, which contains the same information we added in the app_metadata for the user, and the email, which is the Username Claim for the OIDC provider in EKS
11. Now you can modify your kubeconfig file (normally pointed by the environment variable KUBECONFIG, which is the file in Kubernetes that holds your authentication information with users, clusters, and contexts – read more). Also, under the users object, let’s add:
					- name: k8sadmin@boldlink.io
  user:
    auth-provider:
      name: oidc
      config:
        client-id: <client_id>
        client-secret: <client_secret>
        idp-issuer-url: <issuer_url>
        id-token: <id_token>
Additionally, the context object needs to be modified, so that it binds the user thatjust added the EKS cluster:
					contexts:
- context:
    cluster: my-eks-cluster.us-east-2.eksctl.io
    user: k8sadmin@boldlink.io
  name: k8sadmin@my-eks-cluster.us-east-2.eksctl.io
current-context: k8sadmin@my-eks-cluster.us-east-2.eksctl.io
					{
  "https://eks.boldlink.io/groups": [
    "KubernetesSecretsViewer"
  ],
  "nickname": "k8sadmin",
  "name": "k8sadmin@boldlink.io",
  "picture": "https://s.gravatar.com/avatar/xxx..xx..png",
  "updated_at": "2021-11-20T18:10:14.064Z",
  "email": "k8sadmin@boldlink.io",
  "email_verified": true,
  "iss": "https://dev-xxxxx.xx.auth0.com/",
  "sub": "auth0|6197c7a4xxxxxxxxf3025b4",
  "aud": "m7c353eZPbxxxxxxxs0Z4lSCxvjV",
  "iat": 16xxxx31814,
  "exp": 16xxxx31814
}
Now let’s test!
After saving the KUBECONFIG file, let’s try to get the secrets of our cluster:
					➜ kubectl get secrets

NAME                  TYPE                                  DATA   AGE
default-token-h5kbf   kubernetes.io/service-account-token   3      7h21m
Great! It worked, it actually interacted with our Auth0 user. Now, let’s try to get a resource that is NOT allowed for this specific user:
					➜ k get nodes

Error from server (Forbidden): nodes is forbidden: User "k8sadmin@boldlink.io"
cannot list resource "nodes" in API group "" at the cluster scope
Yes! As expected, given that we didn’t give this group access to the nodes resources, it will fail. Note that it explicitly tells you which user is denied.
Considerations
- You can only attach an OIDC provider to an EKS cluster, at least at this time, which might impact your workflow if you already have one for the IAM Roles for Service Accounts solution.
- The OIDC needs to be publicly accessible, so that EKS can access it.
- The version of Kubernetes needs to be 1.16 or higher.
- All access can be audited through the logs EKS exposes to CloudWatch through the audit log. You can also monitor using the authentication log. These are disabled by default when creating a EKS cluster, but you can turn them on or off at any time, just a heads up on CloudWatch cost.